A simple two-way contact sync between Microsoft 365 GALs (Global address lists) in 2025
GAL (Global Address List) is a list of contacts that are accessible to all users across Microsoft 365 (formerly known as Office 365) tenant. This list combines tenant user details, as well as organizational contacts and information about groups. In this article we will explore how you can use SyncPenguin to set up a full two-way sync of GAL contacts between two or more Microsoft 365 tenants.
Setup completion time: 7 minutes.
Setting up the sync
Before you start, be sure to create a SyncPenguin dashboard account here. We provide a completely free 14-day trial with no credit card, so you have a chance to test the syncing and ensure it works as expected before your commitment.
Once signed in to the dashboard, head to the Synchronizations section and click the + New sync button. After that, select the Office 365 GAL Contacts connector as both ends of the sync (see below). Be sure not to select the regular Office 365 or Outlook Contacts connector that is used to sync personal contacts of users.
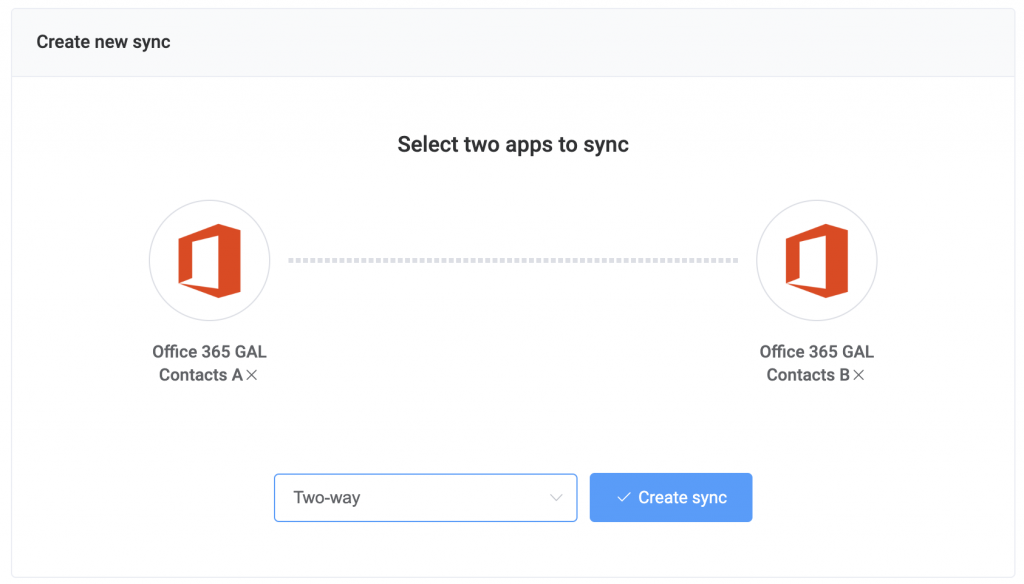
Then, select the Two-way syncing direction and click Create sync. If the intention is to sync GAL one-way, feel free to select One-way as the syncing direction.
Connecting both GALs
Once created, you’ll see the main sync page. One of the sections of the sync page is Sync profile, which is the place where you need to connect both tenants (named A and B for simplicity).
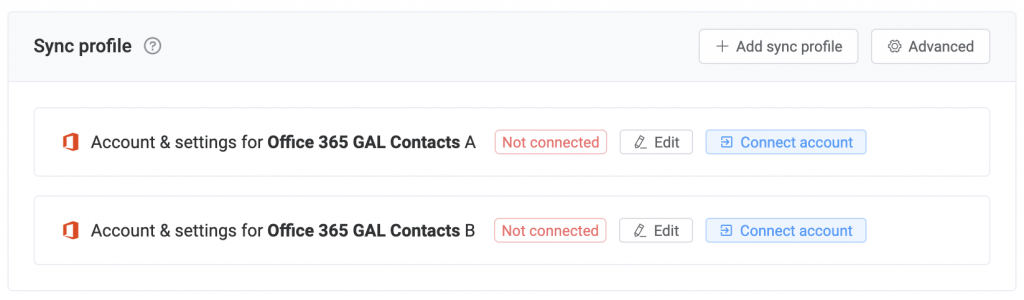
To connect one of the tenants, click the Connect account button and follow the authorization steps. Note that you might need to provide the admin consent to be able to connect a non-admin user. Also note that SyncPenguin uses PowerShell to modify GAL contacts, so we require the Exchange management access scope. If you have any questions or issues with the connection, feel free to contact us.
You can also connect your tenant through an Entra ID app registration without user delegate. To do that, click Edit and change the Connection type to As an application. Click on the How to connect? link to see further instructions.
By default, only member users contact information is synced. If you want to also sync guest users or organizational contacts, click the Edit button and change the corresponding setting (you can select one or more options in the multi-select field).
The other tenant can be connected in a similar way.
Filters and customizations
You can also apply filters or field mapping adjustments in the Field mapping & rules section, where we provide a no-code interface to customize your sync. For example, you can add a filter to sync users/contacts that belong to specific group(s), or to only sync contacts that have a phone number. The flexible interface allows you to configure any custom filter, rule, or field mapping based on available fields.
If you have any questions regarding customizations, feel free to contact us.
Starting the sync
Once both tenants are connected, you are good to start syncing. This can be done in the Actions section of the dashboard. Click the Start syncing button and you’ll be prompted with the following window:
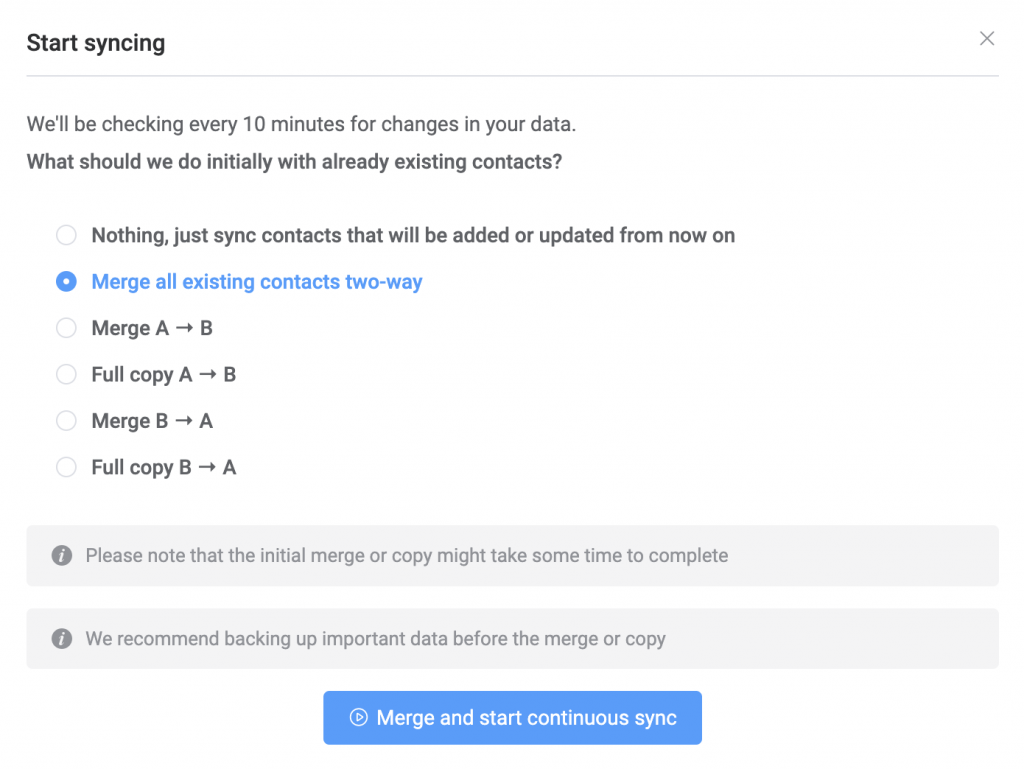
The start options you see instruct SyncPenguin on what to do initially with existing GAL contacts. In most cases you’d either two-way merge contacts between tenants, or merge from one tenant to another. You need to choose the option that better suits your situation and use case. If you are unsure, please feel free to contact us.
Once you make your choice, you need to click Merge and start continuous sync to activate the syncing. Once the initial merge is completed, SyncPenguin will automatically execute the syncing process every 10 minutes (by default) to sync any new changes that occur to your GAL contacts.
Summary
That is it! This is how simple it is to set up a two-way GAL sync between two Microsoft 365 tenants using SyncPenguin. If you have any feedback or questions, feel free to contact us.